In part 2 of the ‘How To Improve INP’ series, we’ll go in-depth on which patterns we can use to improve Interaction-to-Next-Paint (INP) when using React. All patterns can be used with frameworks like Next.js and Remix, too.
Great INP is more important than ever, as it’s a metric reflecting UX and is part of Core Web Vitals (CWVs) – which are used by Google’s search ranking.
This post is part of the multi-article ‘How To Improve INP’ series:
- Part 1: Intro & Yield Patterns
- Part 2: INP & React⚛️ (👈 you’re here)
- Part 3: INP & View Transitions✨ (⌛ coming soon)
Table of contents
Open Table of contents
INP & React⚛️
If you’re building a React based application or library, this blog post is for you. Lots of React librarys cause bad INP as tested by Ariakit. The HTTP Archive also paints a dark picture:
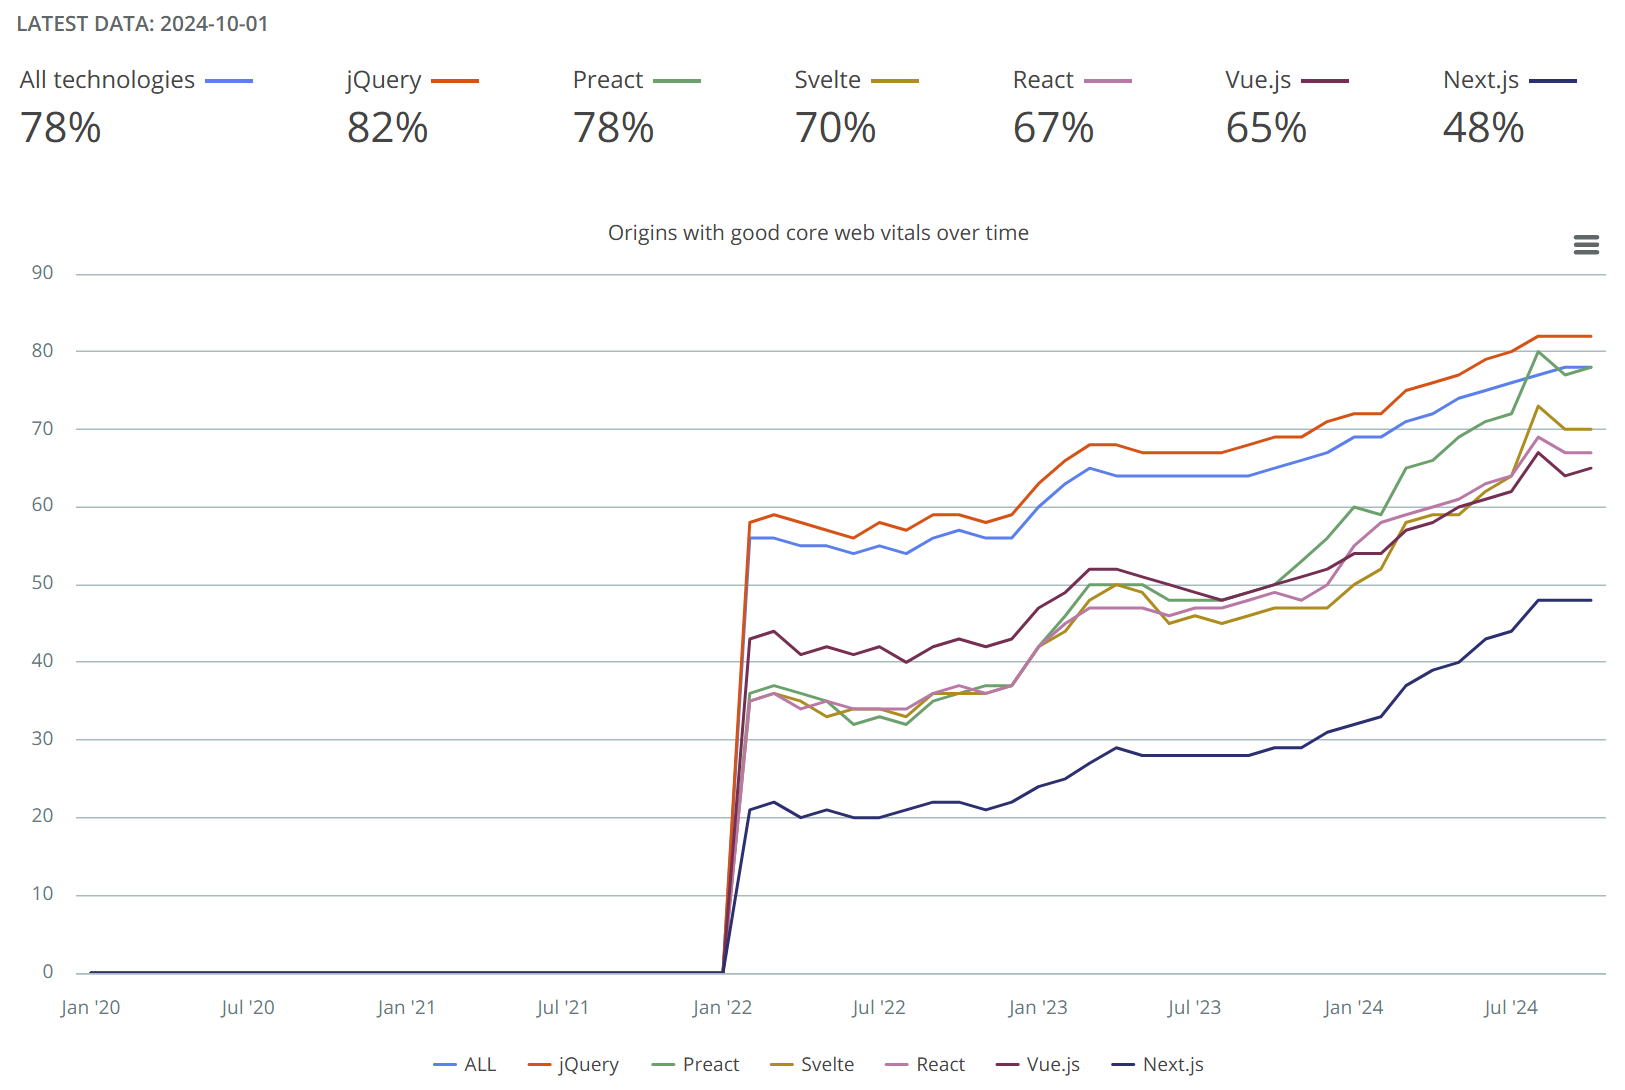
React based websites underperform jQuery (in fact, Svelte, Vue.js and Preact do too). It’s time to change that1.
Before we get started, it is highly recommended to upgrade to React 18 – as upgrading and using the new render/hydration + SSR APIs createRoot/hydrateRoot + renderToPipeableStream already improve INP as written about by
New York Times,
Vercel and Zalando.
| Metric | Home page | Catalog page | Product Details page |
|---|---|---|---|
| INP | -2.92% | -6.76% | -6.09% |
| Exit Rate | -0.43% | -0.06% | -0.06% |
With the upgrade, we also gain multiple options to improve INP. The most important piece is concurrent rendering, which makes React render in a non-blocking way to keep the main thread free from long tasks. React achieves this by automatically yielding every 5ms2. Doing so improves the ‘processing time’ of INP in response to user interactions:
ℹ️️
If another user interaction happens after the yield point, during the expensive JavaScript, it will be attributed to either the ‘input delay’ or ‘presentation delay’. Any optimization done to ‘processing time’ can potentially also improve those.
As a reminder from part 1 of this series, to achieve great INP, we want to:
- Prioritize visible UI work and defer invisible tasks (such as analytics)
- Yield to the main thread before, or frequently during expensive JavaScript functions
- Finish execution faster – improve runtime efficiency, abort previous tasks and run less JS overall
We’ll go over all 3 points in this post, but first a shout-out to the tools React Compiler, react-scan & Million Lint. Those can already help you fix expensive re-renders. Avoiding redundant work is better than any optimized (or aborted) work.
How do you find out what to improve and what’s important for INP & UX? Head over to Part 1’s Intro for more details.
Still here and you want to know how we get great INP in React codebases? Let’s dive in.
Enabling Concurrent Rendering 🔀
We can enable concurrent rendering by making use of the following transition APIs:
useTransition()&startTransition()- Those batch renders, meaning if we call the hook again, only the latest transition will get rendered- They come with a small difference in behavior:
useTransitioncan abort previous renders
- They come with a small difference in behavior:
useDeferredValue()- see also Josh W. Comeau’s blog postuseOptimistic()- see also Jack Herrington’s YouTube video for optimistic UI examples<Suspense>- see more in the hydration chapter of this post- Activity API - currently marked as unstable, but could be used today like Replay.io does
📝️
If you’re interested in how exactly concurrent rendering works, check out Ivan Akulov’s “React Concurrency, Explained” article.
Next to the transition APIs, we can also use the scheduler.postTask API in React to improve performance.
A great example is airbnb’s “Building a Faster Web Experience with the postTask Scheduler” article,
which offers insights into where to use postTask in hooks to, e.g., improve loading of images in carousels or to postpone loading Google Tag Manager (GTM) until after the user has something meaningful to interact with.
Concurrent Hydration with startTransition()
To make sure the hydration process does not block the main thread, wrap any hydrateRoot call in startTransition(...). This makes it so called ‘concurrent’:
// Before - synchronous, non-concurrent hydration:
hydrateRoot(<App />, ...)

// After - 🔀 concurrent hydration:
startTransition(() => hydrateRoot(<App />, ...))
That’s it! Some frameworks do this automatically, e.g. Next.js when using the app router (but not when using the older pages router)3. Let’s investigate what we can do from our side on top…
Selective Hydration with <Suspense>
By making use of <Suspense> boundaries (even without data fetching), we can enable ‘selective hydration’4.
When used, React prioritizes the hydration of the component tree the user interacts with. This improves UX, as users will get feedback faster after user interactions, compared to regular concurrent hydration:
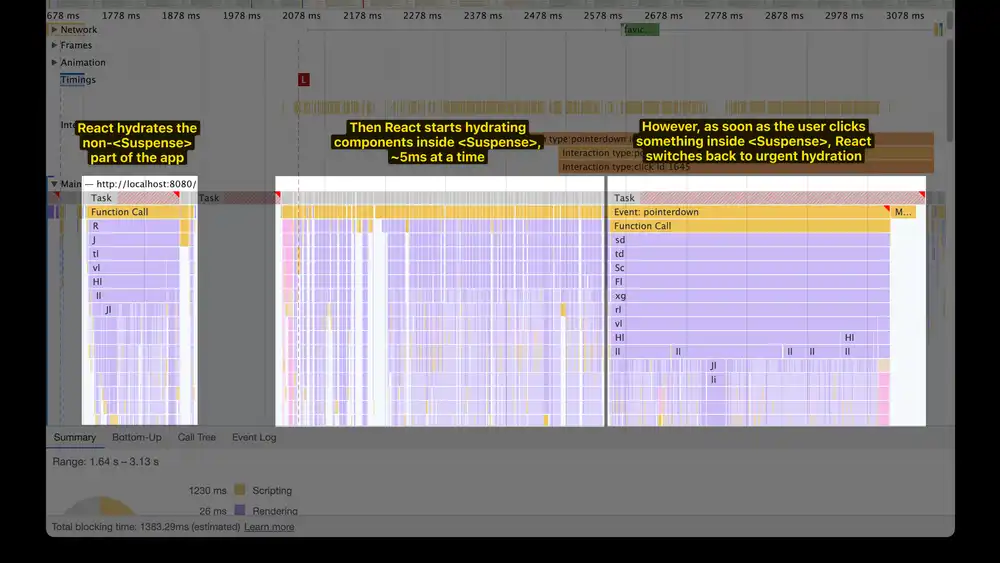
When talking about INP, it is worth noting prioritization in this case means switching to synchronous hydration. As we’ve learned in the earlier chapters, synchronous long tasks might lead to bad INP after an user interaction. At Framer, we’ve seen higher ‘input delay’ and ‘processing time’ as a result.
Thus, it’s in our interest to have a cheap hydration process – this means:
- Being granular with
<Suspense>boundaries, so React synchronously hydrates as few components as possible- one approach could be to wrap different logical sections (like header, main content, footer)
- We don’t want to wrap the entire application with
<Suspense>, as this effectively disables selective hydration and could lead to worse INP5
📝️
A single top-level Suspense boundary can also lead to more wasteful renders during hydration. At Framer, we’ve found hydration becomes 50%+ faster when introducing granular boundaries. Check out the demo sandbox or the detailed blog post.
Progressive Hydration
Another way to lower the hydration cost, is to only hydrate a component when it comes into viewport or when the browser is idle. We call that ‘progressive hydration’.
Other frameworks, such as Astro, offer this out of the box. For React, we’ll have to use react-lazy-hydration6.
Selective and progressive hydration aren’t mutually exclusive, so you can certainly combine them for the best of both worlds. That being said, in future versions of React you can additionally use Server Components. By nature, those are entirely static – which means React does not need to hydrate them at all, thus entirely removing the cost.
Even after optimizing the hydration process, there is another factor that can have an impact on INP:
useLayoutEffect & useEffects, if you use them, keep reading.
Event Handling & (Re-)rendering 🔄
To enable concurrent (re-)rendering in response to user interactions, we need to wrap calls that set state in startTransition().
Sebastian Markbåge from the React team recommends to do this for (almost) every state update.
const MyWordCounter = () => {
  const [value, setValue] = useState('')
  const [count, setCount] = useState(0)

  return (
    <>
      <input onChange={async (event) => {
        // ⬇️ 1. give user meaningful feedback asap (non-concurrent)
        setValue(event.target.value)

        // ⬇️ 2. update word counter in a non-blocking way
        startTransition(() => setCount(event.target.value.length))

        // ⬇️ 3. non-react stuff: send analytics after paint
        await interactionResponse()
        sendAnalytics()
      }} value={value} />
      <p>Concurrently rendered word counter: {count}</p>
    </>
  )
}
By updating the input value first (1.), we make sure users get feedback to their interaction for a great user experience. Only then we start the concurrent re-render (2.) and await the paint (3.) to send analytics. In this example, it is extra important, because we want to make sure the input reflects what the user is typing. The counter itself is a bit less important.
The same principle applies to e.g. submit buttons. For those, we’d want to disable it synchronously, and then handle the form submission in a transition.
ℹ️️
An example where you might not want to do this is, if you need to avoid UI tearing – see also the React 18 tearing demo by Colin Campbell.
Uncontrolled Inputs
For inputs specifically, we also have the option to leave the input uncontrolled by passing a defaultValue prop.
Uncontrolled means React does not update the value prop and the browser keeps the control over updating it, which delivers best INP possible.
The React docs on optimizing re-rendering for <input>s also apply to optimizing for good INP.
Keep in mind, while transition APIs make React rendering faster, they have no impact on JavaScript execution outside of React components and browser rendering. See the next chapters for more.
💡️
Did you know React handles autofocus manually?
Sentry replaced React’s native handling of the prop with a manual focus function to improve INP.
If you like such small tips, I collect many further in my awesome-performance-patches repository.
Use CSS to give feedback🖌️
When handling events in the UI via JavaScript (or React), we need to be careful about event listeners that are usually triggered consecutively, which we can recognize by the their event names followed by down and up.
An example of such event is the click event –
on mobile, before click is triggered, we see pointerdown, then pointerup, and only then click is fired.
If you respond to some of those events, it can look like this:
click event handlers follows pointerup immediately, with no paint inbetween.So, if we respond to multiple events that happen in short succession, we might see bad INP again.
A fix is to to yield to the main thread and instead use CSS to respond to the input immediately, by using CSS pseudo-classes
like :active or :focus to give users feedback to their interactions:
#myBtn:active {
  box-shadow: 2px 2px 5px #fc894d;
}
const MyBtn = ({ onPointerdown, onPointerUp, onClick }) => (
<button id="myBtn" onPointerDown={async (event) => {
// you can also use `interactionResponse` here
await yieldToMain()
onPointerDown?.()
}}
onPointerUp={async (event) => {
// you can also use `interactionResponse` here
await yieldToMain()
onPointerUp?.()
}}
onClick={async (event) => {
// you can also use `interactionResponse` here
await yieldToMain()
onClick?.()
}}>Click me</button>
)CSS makes sure our users see feedback to their interaction, so we can yield between those events and still achieve great UX.
The yielding makes sure the callbacks are handled in new tasks, potentially allowing the browser to paint (or guaranteed if you use await interactionResponse()).
📝️
Nadia Makarevich’s “replace React code with the CSS :has selector” article covers another great example.
Replacement for synchronous useEffects: useAfterPaintEffect🎨
As hinted to earlier, useEffects can also cause bad INP – even if they usually run after paint.
The usually is exactly the culprit. There are multiple reasons that can lead to them being executed before the browser paints, potentially delaying or making the paint more expensive:
- state updates in
useLayoutEffect - state updates in event handlers – especially relevant for INP
📝️
The Deeper Dive Chrome extension adds links to topics like this useEffect behavior right on react.dev.
There are scenarios where firing before a paint improves UX, as the React Core developer Andrew Clark explains here.
In other scenarios on the other hand, it might be beneficial to use await interactionResponse() before running the expensive callback, to make sure they don’t block the main thread in response to user input.
At Framer, we’ve started monitoring and improving mount effects7, to make sure effects don’t block the main thread post-hydration for longer than really needed. Here’s a trace of what we’ve seen happen because of them synchronously running after the hydration process:
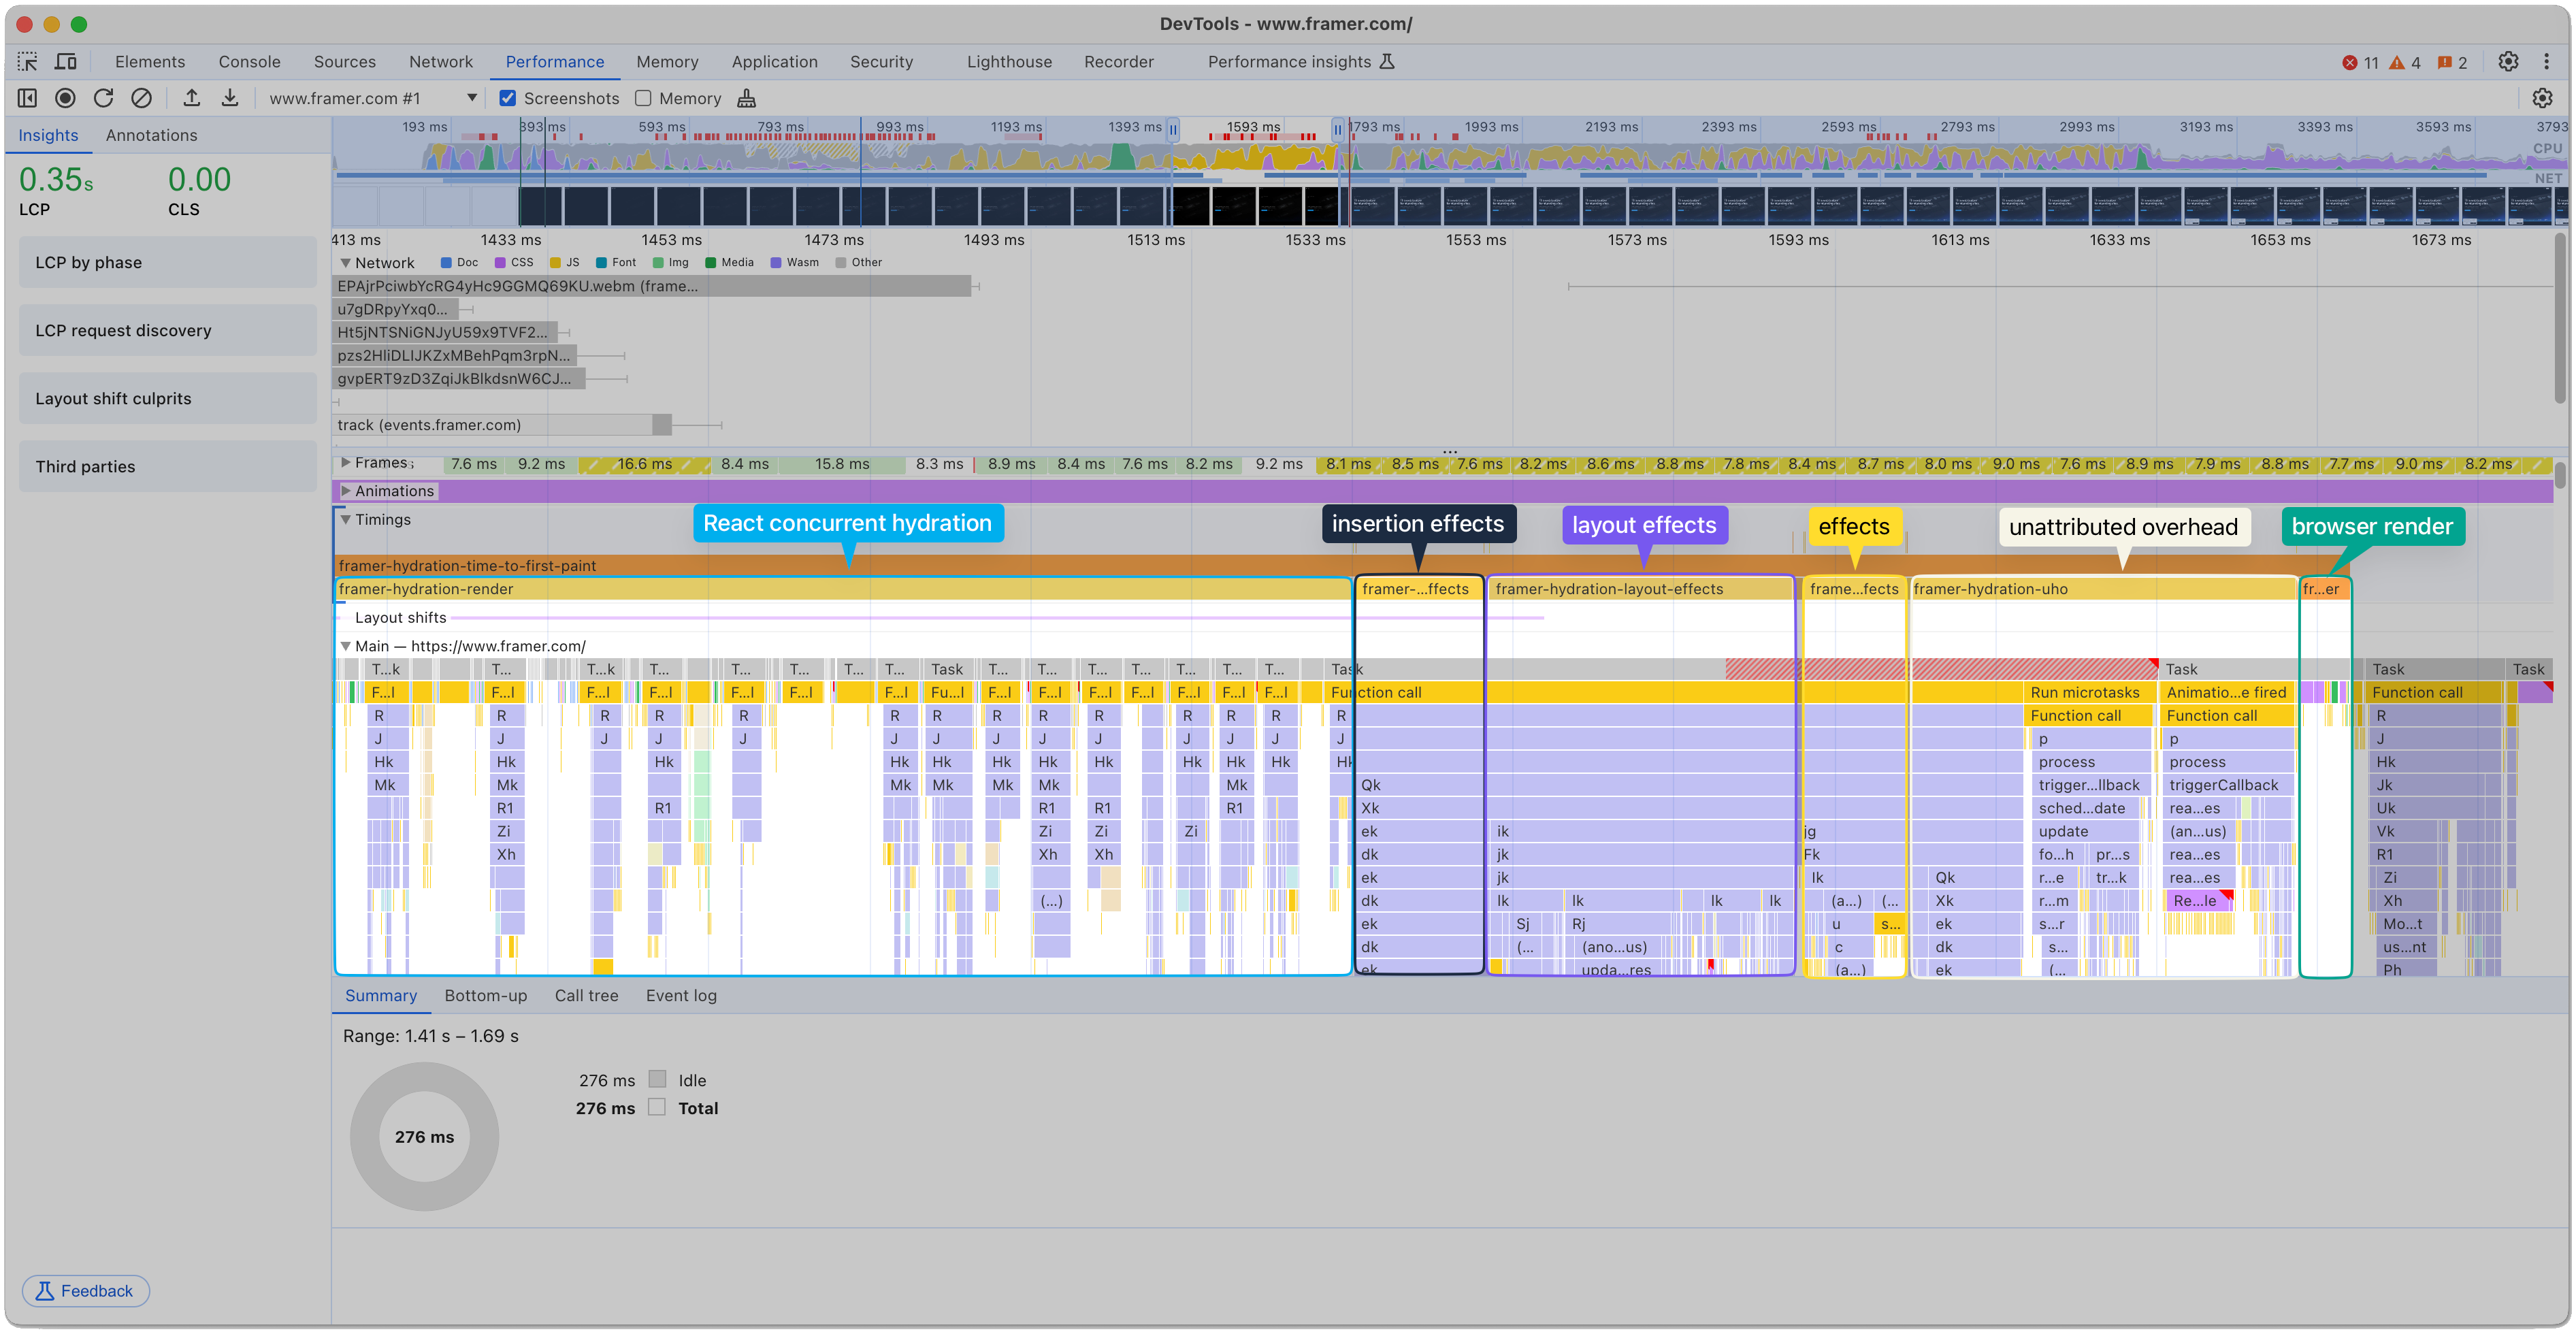
performance.measure calls for every (synchronous) effect that can run after hydration: insertion, layout, regular effects, unattributed hydration overhead (UHO, which includes things like batched requestAnimationFrames) and the final render duration.In the trace, we see the concurrent hydration part first, and then a long task, caused by synchronous insertion, layout, DOM commit and regular effects. Only after those synchronous tasks, the browser has the chance to present a frame to the user.
Depending on how expensive the effects are, if an user interaction happens in that time period, there is a chance we’d get bad INP. While it is usually expected that insertion and layout effects run synchronously (due to how they work), some regular effects might not need to.
In those scenarios, the key is to understand React controls when it calls our effects, but cannot control how long the callbacks we provide run. All the learnings about yielding, splitting, prioritizing and aborting tasks from the previous chapters apply to effects too.
For fixing synchronous effects, or guaranteeing good INP, we can make use of two approaches. The first one is substituting the useEffect with useAfterPaintEffect:
/**
 * Runs `fn` after the next paint. Similar to `useEffect`, but guarantees to run after the next paint (both cleanup and effect).
 * @see https://thoughtspile.github.io/2021/11/15/unintentional-layout-effect/ - use this when effects run after state updates in event handlers
 *
 * @param useEffectFn pass `useEffect` for less important updates (those will mostly run after a 2nd paint)
 */
function useAfterPaintEffect(
    useEffectFn: Parameters<typeof useLayoutEffect>[0],
    deps: Parameters<typeof useLayoutEffect>[1],
    opts?: SchedulerOptions,
    useEffectFn = useLayoutEffect
) {
    useEffectFn(() => {
        const runAfterPaint = async (fn: typeof effectFn | (() => void)) => {
            await interactionResponse(opts)
            return fn()
        }
        const runPromise = runAfterPaint(effectFn)

        return () => {
            ;(async () => {
                const cleanup = await runPromise
                if (!cleanup) return
                runAfterPaint(cleanup)
            })()
        }
    }, deps)
}

// Usage
const MyComp = () => {
  useAfterPaintEffect(() => { // ⬅️ replaces any regular `useEffect`
    sendAnalytics()

    return () => {
      // some cleanup fn
    }
  }, [], { priority: 'background' })
}
Quick note on the useEffectFn parameter:
- Passing
useLayoutEffectasuseEffectFn(the default here) makes the hook more accurate, as it runs immediately (and guaranteed) after paint - Passing
useEffectmakes the hook also run guaranteed after paint, but it runs more delayed (after another paint)
ℹ️️
When using the Activity API, useLayoutEffects are not run (useEffects are), so using it as useEffectFn allows to skip doing some work until it’s really needed8.
We could also use yieldToMain inside the useEffectFn implementation and call the hook afterYieldEffect. The intended effect then runs much closer to the timing of the useEffect in most cases, with the difference
if the useEffect becomes synchronous, the browser will still yield to the main thread (implications mentioned in part 1 of the series).
To see the hook in action, check out the demo. I’ve added a slightly modified variant called useAbortSignallingEffect,
that aborts effects if another call to the same effect happens before the previous one has run (similar to useAbortSignallingTransition). This can make sense if you only care about the latest result that has been painted.
Option 2: If we cannot change the useEffect if it’s e.g. in 3rd-party components, we can make use of a modified variant of the useTransition hook. useTransition usually runs after paint, but does not guarantee it9.
Jan Nicklas made a useTransitionForINP hook that guarantees it,
with a demo available.
Abort redundant work: Abortable Transitions 🛑
React can discard work started through transitions, but React cannot control our outside-React code.
That means, while repeated startTransition() calls can be batched to just one render, it will not abort any work outside of the React world.
If we run expensive functions, e.g. maybe filtering data of search results takes 500ms, the React scheduler won’t have any way of controlling that.
The same can be said for any other function call – if it’s expensive and not aborted once it becomes redundant, it will block the next paint. In the scope of INP, this means future user interactions might have higher ‘input delay’.
If the result of the calculation is no longer relevant to the user, it is no longer needed. Make sure to stop redundant calls.
For doing so, we can make use of the AbortController class.
By passing along the signal property and listening to the abort event, like so: abortController.signal.addEventListener('abort', ...), we can abort any work that’s no longer needed.
For example, if the user has already closed the search panel, we can skip on-going future search filtering work to reduce the activity on the main thread.
In the React world, Michal Mocny’s Next.js INP workshop from the Google I/O 2023 guides us through how a solution could look like:
In the workshop, he introduces the custom hook called useAbortSignallingTransition (for both plain React and Next.js).
We can use it to abort running transitions and non-React code. Combined with yielding to the main thread frequently during the expensive filtering of the search component,
this can improve INP drastically by preventing expensive & no longer needed tasks from blocking the main thread.
You can play with the hook in the sandbox below 👇
Portals: Unmount during an idle period
Modifying the DOM, especially children of <body>, can cause a longer style, layout and paint task, which makes generating the next frame more expensive.
While this isn’t directly reflected in INP’s processing time, it is caused by things done during processing time and can extend ‘processing time’ and ‘input delay’.
For unmounting portals, a solution is to first hide contents via CSS’ display: none and then schedule removing via requestIdleCallback
as done in the PubTech web.dev case-study.
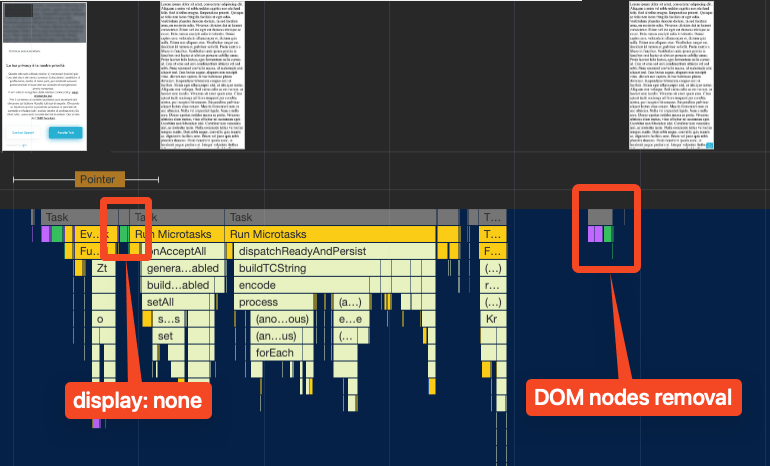
Alternatively, append or remove nodes from very shallow children, like shown by Atif Afzal in the article “don’t attach tooltips to document.body”, where the runtime duration improved 80ms to 8ms.
Here’s an example React component:
function MyComponent() {
  const [renderPortal, setRenderPortal] = useState(true)
  const [isVisible, setIsVisible] = useState(true)

  return (
    <div style={{ border: '2px solid black' }}>
      <button onClick={() => {
        startTransition(() => { // ⬅️ adding to the DOM can be expensive, so let's use a concurrent update
          setIsVisible(true)
          setRenderPortal(true)
        })
      }}>Show my portal</button>

      <button onClick={() => {
        setIsVisible(false)

        requestIdleCallback(() => setRenderPortal(false)) // ⬅️ unmount the portal when the browser is idle
      }}>Hide my portal</button>

      {renderPortal ? createPortal(
        <p style={{ display: isVisible ? 'block' : 'none' }}>This child is placed in the document body.</p>,
        document.body
      )}
    </div>
  );
}
At Framer, we do this for things like overlays and dialogues/modals.
While at it, modals usually add overflow: hidden or similar CSS on <body>, which can cause expensive style recalcs – we use await-interaction-response and only then update the CSS in a requestAnimationFrame callback to reduce the cost.
For components like @radix-ui/react-dialog, I’d also recommend to use await-interaction-response before opening the dialog, as it causes high INP otherwise (see this open PR).
Summary: Where to start?
Here’s a check list of things I’d start with:
- Upgrade to React 18 / latest Next.js version
- Wrap the hydration call in
startTransition() - Use RUM or DevTools to check where your culprits are
For any new React code you write, I recommend to engineer components with concurrent rendering in mind – use startTransition() & similar APIs around state updates by default.
Also, useAfterPaintEffect is a great way to get rid of unwanted state updates in (layout) effects, as you can no longer rely on them running immediately after the effect executes.
Avoiding state updates in effects is also what the maintainer of TanStack Query recommends, through the eslint plugin eslint-react.
Or maybe you don’t need the effect at all?
For big applications, I’d start introducing <Suspense> for new features; for example, when adding a new type of section to a user profile, wrapping the new component is a great starting point
to introduce Suspense to the codebase.
Last but not least, especially when writing search inputs or if you do a loop somewhere that could get to thousands of iterations, avoid and abort redundant work, and yield frequently.
In general, the methods & tips mentioned in part 1 apply in React codebases too. Keeping all of those techniques in your backpocket is a great way to ensure your application or library offers great UX & INP consistently.
Footnotes & Comments
This post is part of the multi-article ‘How To Improve INP’ series:
- Part 1: Intro & Yield Patterns
- Part 2: INP & React ⚛️ (👈 you’re here)
- Part 3: INP & View Transitions (⌛ coming soon)
Thank you to Michal Mocny & Gilberto Cocchi for reviewing this post.
Footnotes
-
I wouldn’t ditch React as a result, but Microsoft’s Alex Russell has a different opinion on that. ↩
-
A single boundary will lead to a big synchronous task, as shown by Ivan ↩
-
For Next.js, there is also an exploration by Lukas Bombach called “next-super-performance”, it’s dated by now, but kind of resembles the idea of React Server Components, as it only hydrates interactive components instead of the entire root (making every such component its own root, kind of). ↩
-
Effects that run once when the component has mounted (in this case for the first time after hydration):
useInsertionEffect(..., [])/useLayoutEffect(..., [])/useEffect(..., [])↩ -
See also “How Suspense works internally in Concurrent Mode 2 - Offscreen component” ↩
-
See also Michal Mocny’s reply in the CWV Google Group ↩

