
In the following, we’ll go over different patterns we can use to yield to the main thread to improve the Interaction-to-Next-Paint (INP).
Knowing how to improve INP is more important than ever, as it’s a metric reflecting User Experience (UX) and has recently been added to the Core Web Vitals (CWVs) – which are used by Google’s search ranking.
We’ll take a look at which part of INP we’re targetting, how browser scheduling and yielding works, pros and cons of each pattern and where we can make use of those.
If INP is entirely new to you, I’d recommend checking out Google’s INP introduction post first – as this post is very technical.
📖 This post is part of the multi-article ‘How To Improve INP’ series:
- Part 1: Intro to Yield Patterns (👈 you’re here)
- Part 2: INP & React⚛️
- Part 3: INP & View Transitions✨ (⌛ coming soon)
Table of contents
Open Table of contents
INP & Yielding — What to Expect
Let’s start with a quick reminder of the three stages of INP – ‘input delay’, ‘processing time’ and ‘presentation delay’:
We’ll mostly focus on the ‘processing time’ in this post, with some tips for ‘input delay’ and ‘presentation delay’. The key to speeding up INP is to allow the browser to start painting as soon as possible. Painting is done on the main thread, so we have a few options to unblock it:
- Prioritize visible UI work and defer invisible tasks (such as analytics)
- Yield to the main thread before, or frequently during expensive JavaScript functions
- Finish execution faster – improve runtime efficiency, abort previous tasks and run less JS overall1
All cases aim to give the browser a chance to paint a frame and present it to the user faster. Giving the chance fast after a user interaction is what good INP is all about.
In this article, we’ll go over case a. & b., while part 2 covers case c. So, whenever we say “yield to the main thread”, we mean to tell the browser “continue execution here later”. But how do we prioritize or yield? Let’s dive in.
How do we know what to improve?
By using a Real User Monitoring (RUM) provider, or the Chrome DevTools, you can better understand which part you need to improve. Here’s how a slow ‘processing’ entry looks like:

If another user interaction happens before completion of the first one – so called overlapping input handlers like mousedown and then mouseup –
it can be attributed to either the ‘input delay’ or ‘presentation delay’, depending on which interaction we inspect (first or last one).
This means, anything queued in ‘processing time’ (e.g. setTimeout, requestAnimationFrame, fetch handlers) can have impact on future event handlers – and vice-versa, any optimization done to ‘processing time’ can potentially improve them.
Google’s INP guide offers further info about input and presentation delay fixes.
💡️
Did you know 100ms is the goal?
The ‘good’ INP threshold is 200ms, but Google’s RAIL model & recent research show 100ms is the sweet-spot for the best UX in response to user interaction. A study done by SpeedCurve demonstrates the impact, where conversion rate is ~10% higher at 100ms vs. 250ms of INP on mobile.
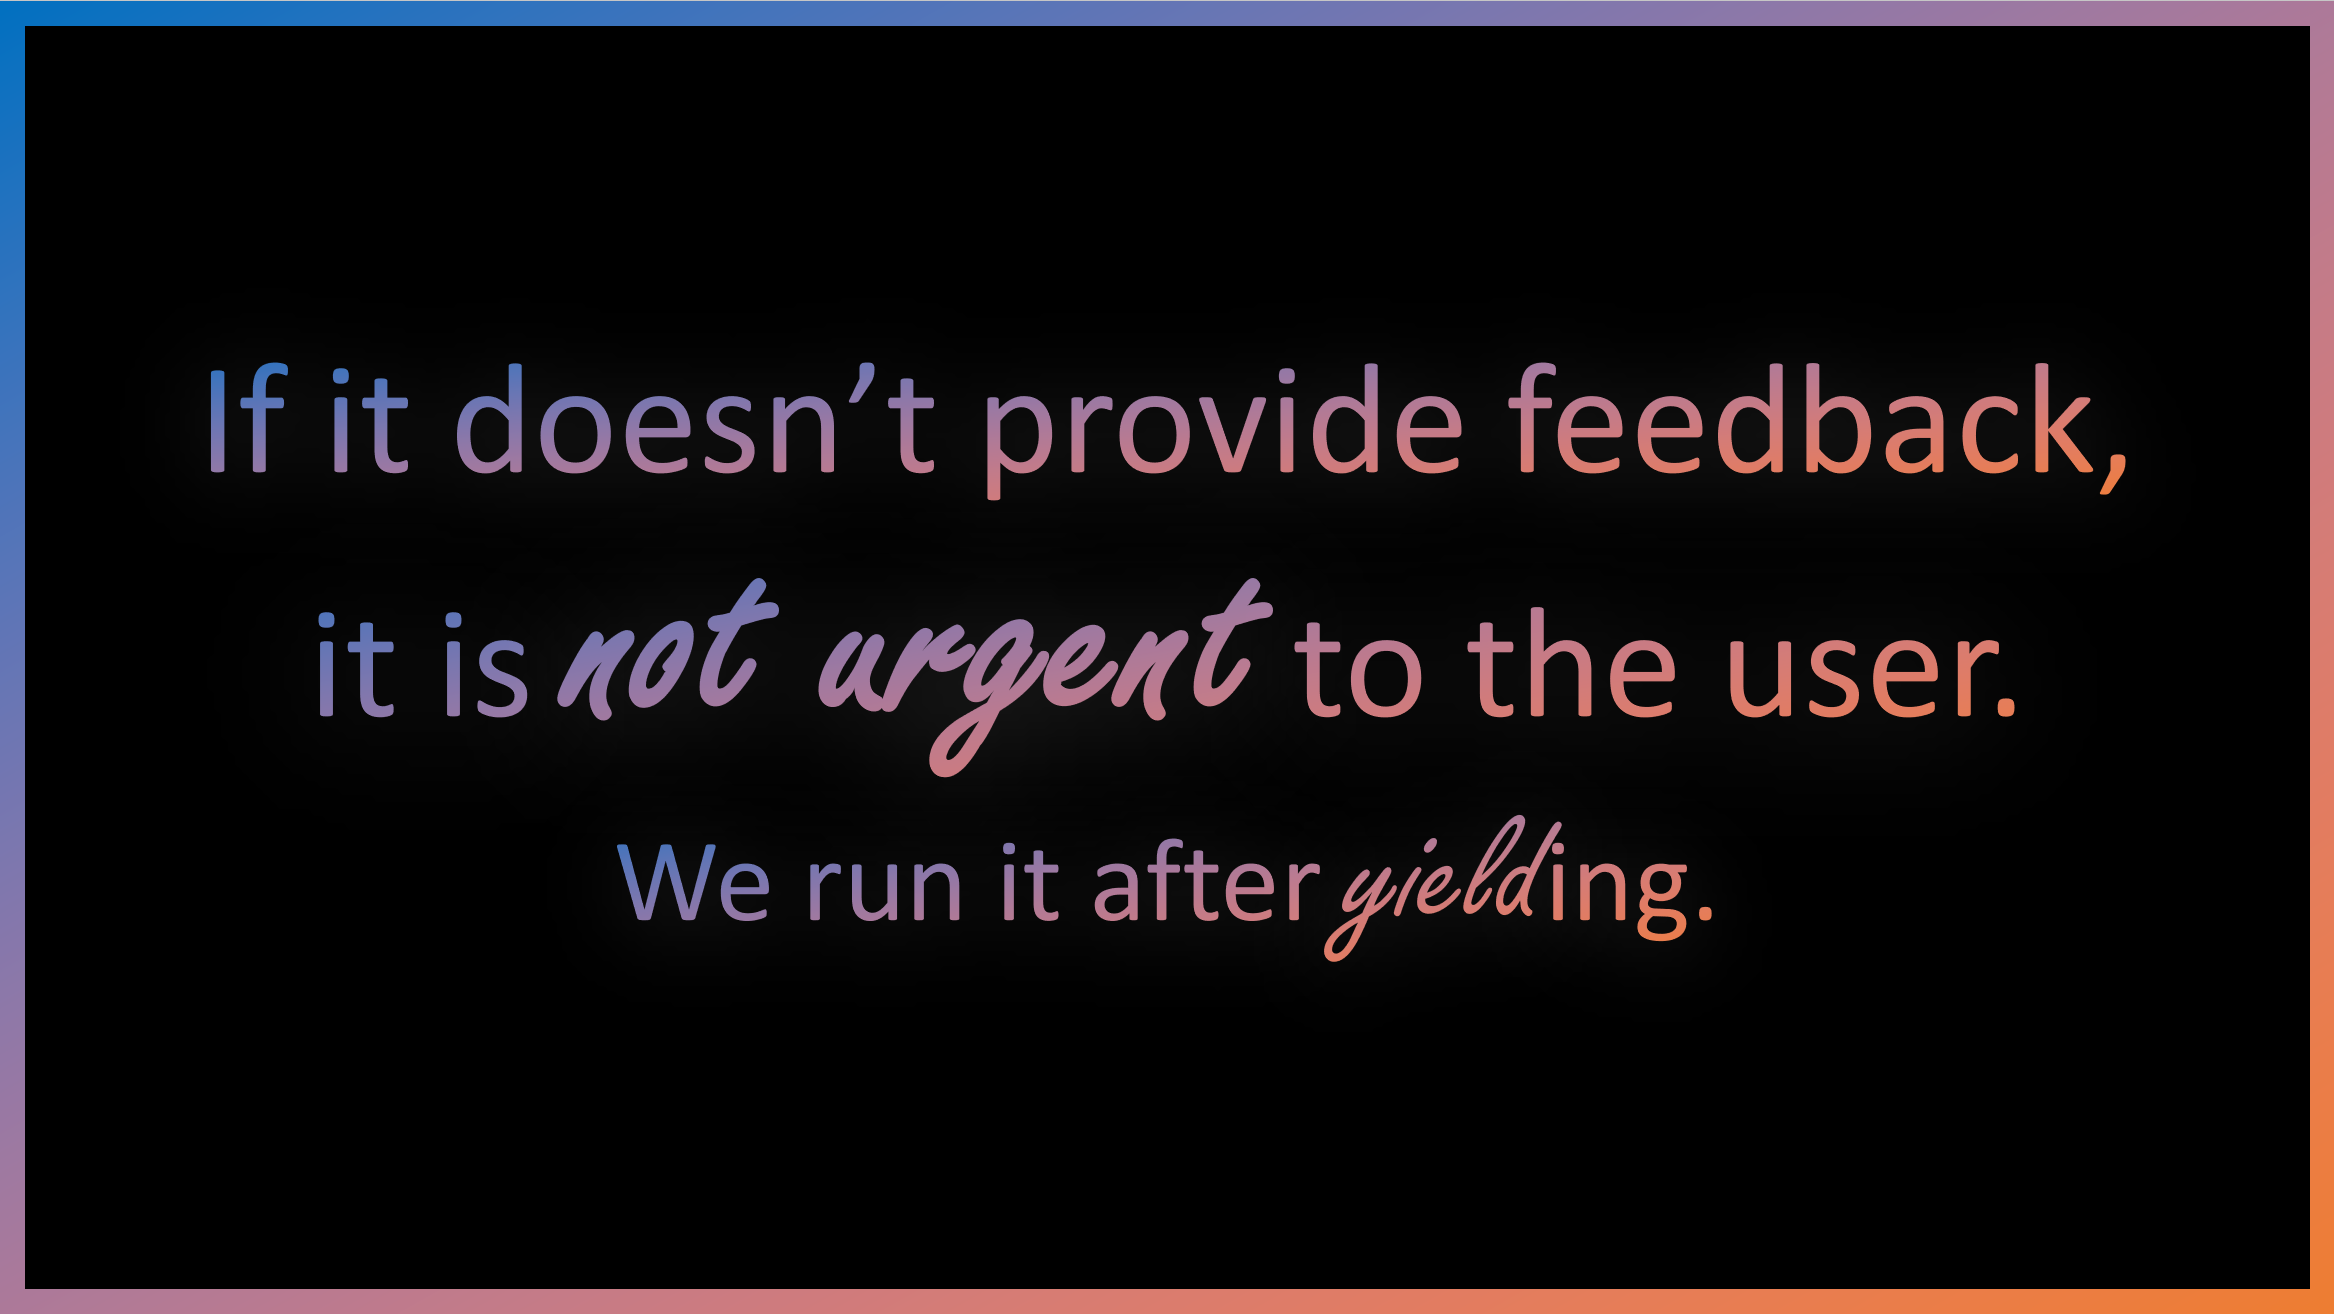
Keep in mind, the goal of INP is to improve user experience – we want to show users meaningful feedback to their interactions. While doing literally nothing as response is a way to achieve good INP scores (it gives the chance to paint), the goal is to update the UI to signal the user the application has received the input – as fast as possible.
Feedback can be anything from allowing the browser to paint updated button styles or closing a dropdown, to showing spinners or a “Processing…” message if the action takes longer. Do postpone less meaningful work (e.g. analytics). We’ll go over examples how to do this further down in the post.
That being said, let’s start with an overview over various production-grade patterns to improve INP in one place, used by performance experts and companies like Google, Meta, airbnb, Vercel and Framer.
Run after paint: await-interaction-response
The first pattern to improve INP defers code that awaits the function to (somewhen) after a paint2.
It has been first introduced by Vercel CTO Malte Ubl’s “Demystifying INP” post as npm package.
function interactionResponse() {
  return new Promise((resolve) => {
    setTimeout(resolve, 100) // Fallback for the case where the animation frame never fires.
    requestAnimationFrame(() => {
      setTimeout(resolve)
    })
  })
}
By scheduling a setTimeout inside the requestAnimationFrame callback, we queue a new JavaScript task3 that runs earliest before the browser starts rendering the next frame.
This makes sure the promise is resolved only after a paint has happened2.
While it looks odd if you see it for the first time, we can better understand how this works by taking a look at when exactly requestAnimationFrame (rAF) runs – at the start of the frame rendering pipeline, after the browser runs all the regular JavaScript timers and events:

setTimeout task executes in a frame after a paint(based on Paul Irish’ “requestAnimationFrame scheduling for nerds”)
If we were to run the callback right away in the requestAnimationFrame, we’d move the callback execution to right before the paint as the image shows.
We don’t want this, as we want to make sure the browser paints as fast as possible.
In other words, by awaiting the timeout, we yield to the main thread and give the browser the chance to paint before running the callback. Here’s an example:
someButton.addEventListener('click', async (event) => {
  doSomeImportantUIWork(event) // ⬅️ 1. give user meaningful feedback
  await interactionResponse()  // ⬅️ 2. yield by awaiting the paint
  performance.mark('paint-done')
})
It also works as cross-browser compatible way of measuring how fast a paint happens, e.g. first paint on page load or after some interactions like in the example above.
💡️
If you need layout information such as height or width of a DOM element, you can use an IntersectionObserver like Meta does. This approach gives you DOM sizes without forcing another layout task, improving performance as a result.
Pros
This approach ensures a paint has happened. Compared to just setTimeout, where browsers might choose to batch paints4, we guarantee the callback runs after a paint.
The pattern can also be used to optimize DOM writes and reads to prevent the browser from running a ‘layout’ task in the middle of a frame (called ‘layout trashing’):
- Put DOM writes into
requestAnimationFrame()(e.g.,node.classList.add(...)) - Put DOM reads after
await interactionResponse()(e.g.,getBoundingClientRect& many more that force reflow)
Cons
The setTimeout() can suffer from ‘queue jumping’:
The callback given to setTimeout is scheduled to run at the very end of the tasks queue, while tasks from competing or higher priority sources could be moved to the start. This creates a potential dilemma, as the execution of fn might be delayed for longer if there are other tasks already in the queue (for example from third-party scripts like ads or analytics).
While you’re not guaranteed to run into this issue, in the next chapter, we’ll take a look at a solution that avoids this potential issue.
Additionally:
- If used to measure paints, be aware that the timing is not perfectly accurate, as it is not guaranteed to immediately run after the paint has happened, see footnotes2. The proposed
scheduler.renderfixes this. - Might never run if called close to a user leaving the website – see the Exit Event Handlers:
yieldUnlessUrgentchapter for an improvement. - Could run delayed (100ms) if a user switches away from the tab, due to
requestAnimationFramethrottling.
ℹ️️
If used to measure the first paint of a page, make sure to also run it on the pagehide event so that fast-back cache restores execute the code as expected.
A more modern way is the new pagereveal event, which handles this automatically.
References
- Malte Ubl
- Avoid large, complex layouts and layout thrashing
- Optimize DOM read/write: High Performance Input Handling
General Purpose: yieldToMain
As mentioned in the beginning, frequently yielding to split long, expensive tasks, into multiple cheaper and smaller ones, is a great approach to unblock the main thread.
The new JavaScript scheduler.yield API does exactly that.
Compared to await interactionResponse(), it does not guarantee improved INP, but can improve INP.
We’ll take a look why next and clarify when to use which of those two in the chapter right after.
As of May 2024, the scheduler API is still in-progress and only available in Chromium, which is why the following pattern has emerged as general purpose utility for yielding:
- Use
scheduler.yieldif available - Fallback to the next modern API –
scheduler.postTask - Fallback to
setTimeoutas a last resort; unless high priority, where we resolve immediately
/**
 * Yields to main thread before continuing execution.
 * If priority is 'user-blocking', it will asynchronously resolve in older browsers.
 * @param {object} options - see [https://github.com/WICG/scheduling-apis/blob/main/explainers/yield-and-continuation.md](spec)
 */
function yieldToMain(options) {
    if ("scheduler" in window) {
      if ("yield" in scheduler) return scheduler.yield(options)
      if ("postTask" in scheduler) return scheduler.postTask(() => {}, options)
    }

    // `setTimeout` could suffer from being delayed for longer - so for browsers not supporting yield,
    // we guarantee execution for high priority actions, but it doesn't yield as trade-off.
    if (options?.priority === 'user-blocking') return Promise.resolve()
    return new Promise((resolve) => setTimeout(resolve))
}

// A little helper which yields before running the function
async function yieldBefore(fn, options) {
  await yieldToMain(options)
  return fn()
}

// Usage
const myYieldingLog = yieldBefore(() => {
  console.log('This runs with high priority after yielding')
}, { priority: 'user-blocking' })
For the priority property in options, the usual default priority is user-visible. Depending on the task, you can pick user-blocking for high priority tasks (think “queue at the start”) and background for tracking related events (think “queue at the end”).
Let’s investigate again why we use setTimeout only as fallback. It works well in most cases, but is prone to queue jumping as described in the ‘cons’ above. The callback (blue) runs after the execution of higher pririoty tasks (gray):
scheduler.yield fixes this behavior by guaranteeing continued execution (blue) before executing the next tasks (gray):
So continuation allows us to be certain that our task runs and is not post-poned for a longer period.
Pros
- Makes it easy to slice up long tasks into smaller ones – make sure to split tasks into smaller ones that run no longer than ~50ms (see Google’s RAIL model)
- Perfect for processing tasks, as compared to
await-interaction-responseit doesn’t make the total processing duration slower - Progressively enhances yielding if
scheduler.yieldis available, or gracefully falls back to supported APIs - For critical tasks in older browsers, uses an asynchronously resolved Promise to ensure order-of-execution
Cons
- Less ideal for deferring UI work, because it doesn’t guarantee a paint before continuing execution —> we need to know how long / expensive our tasks are to make sure it improves INP
- The concept of yielding & continuation is slightly more complex to understand, compared to awaiting a paint and then running code
- Limited browser support, e.g. in older browsers, high priority tasks would not yield
References
When to use await-interaction-response vs. yieldToMain?
Now that we know how both patterns work, a question arises – when to use which? Barry Pollard says this:
I’d advocate for splitting the tasks liberally using something like
yieldToMainat good yield points and then letting the browser worry about what to schedule when. In most cases that should strike a good balance between optimizing INP and also getting the work done, without having to think too much about it.
Let’s take a look at an example to make the difference between those two more clear:
// assume `items` is a very large array
async function filterResults(searchTerm: string, items: any[]) {
  const results = []
  for (const item of items) {
    // please don't blindly copy this code - it might not make sense to yield after every iteration.
    // there is an improved snippet below.
    await interactionResponse() // ⬅️ Pick either
    await yieldToMain()         // ⬅️ Pick either

    // check if the item matches the search term
    if (itemMatchesSearch(item, searchTerm)) {
      results.push(result)
    }
  }

  return results
}
With await interactionResponse(): Defers the call to the next task after an animation frame. For a 60 Hz monitor, a new animation frame happens around every 16ms.
This means, if the for loop and itemMatchesSearch runs for 2ms, it then waits for after the next paint, runs 2ms, waits, runs 2ms, (…):
The downside: Yielding and waiting for the next paint after executing just one task does not always make sense if the browser is idle otherwise, as it’d be just wasting time for no good reason.
Try it out – time it takes to calculate the result:
💡️
You could improve interactionResponse() by replacing setTimeout(resolve) with yieldBefore(resolve) to avoid the mentioned queue jumping issue. It also speeds up the example above slightly.
With await yieldToMain(): Defers the call to the next task.
If a paint has been scheduled, it gives the browser the chance to do the paint. Otherwise, it will execute the callback. Which means, 2ms execution, then 2ms execution, (…), until a paint is inbetween, then 2 ms execution.
The downside: It fails to improve INP for unpredictable workloads, if one execution takes 2ms, the next one 500ms, then 2ms. The 500ms task would hold the next paint back until finished.
Try it out – time it takes to calculate the result:
The result is so drastically different, because we’re no longer blocking the execution on waiting for an animation frame.
The important takeaway here is, both patterns have their pros and cons. Both methods fail if one task takes 2ms and the next takes 500ms while a user interaction happens. Thus, it is important to split long tasks into smaller ones and to abort on-going work if possible (we’ll investigate ‘abortable transitions’ in ‘part 2’ of the series).
That being said, a combination can deliver the best of both worlds:
- Update the UI immediately to give meaningful feedback for best UX (keep it fast)
- Defer non-critical UI updates until the next paint via
await interactionResponse() - Split long tasks into smaller ones via
yieldToMain()and abort redundant ones to keep tasks below ~50ms
With 2., we ensure the browser has a chance to paint a frame faster than 200ms – the ‘good’ INP threshold – in response to user interaction. Finally, with 3., our goal is to keep the browser responsive to unblock future event handlers:
Here’s how that might look like when we combine all of the above with a basic scheduler:
// ⬇️ We introduce a 'limit' for 3., so the loop stays below ~50ms
const QUANTUM = 48; // ms, 3*16ms (3 frames on 60 hz)

async function searchFilterHandler(searchTerm: string, items: any[]) {
  // ⬇️ 1. Update UI by e.g. changing opacity of previous results
  updateUI()
  // ⬇️ 2. Await the next paint
  await interactionResponse()

  // ⬇️ Store timestamp+limit, so we know when to stop
  let deadline = performance.now() + QUANTUM

  const results = []
  for (const item of items) {
    // ⬇️ 3. Yield when we've crossed the deadline
    if (performance.now() >= deadline) {
      await yieldToMain()
      deadline = performance.now() + QUANTUM // update limit
    }

    // check if the item matches the search term
    if (itemMatchesSearch(item, searchTerm)) {
      results.push(result)
    }
  }

  return results
}
We can of course fine-tune QUANTUM depending on how fast or slow itemMatchesSearch is and other tasks that are running in parallel. With a billion items in the array, 48ms might still be too slow.
The trade-off to make is either faster results or a more responsive UI (= possibly better INP).
References
- web-vitals-feedback Google Group thread, images are slightly modified with permissions from Barry Pollard
- a yieldier scheduler from web.dev
- Update December 2024: Rick Viscomi wrote a blog post that expands the pattern for smoothness
Exit Event Handlers: yieldUnlessUrgent🚪
Compared to yieldToMain, yieldUnlessUrgent - created by Google Engineer Philip Walton - contains safe-guards on top to ensure that the code after the yield point eventually runs.
This is needed in event handlers that must run before a user leaves the page. An example would be business-critical tracking events when clicking a link.
For those critical events, if we were to use yieldToMain, there is a chance the code after the yield point never executes as the browser might have unloaded the page already (which stops any JavaScript execution).
/** A set to keep track of all unresolved yield promises */
const pendingResolvers = new Set()

/** Resolves all unresolved yield promises and clears the set. */
function resolvePendingPromises() {
  for (const resolve of pendingResolvers) resolve()
  pendingResolvers.clear()
}

/**
 * Returns a promise that, if the document is visible, will resolve in a new
 * task in the next frame. If the document is not visible (or changes to
 * hidden prior to the promise resolving), the promise is resolved immediately.
 * @return {Promise<void>}
 */
export function yieldUnlessUrgent() {
  return new Promise((resolve) => {
    pendingResolvers.add(resolve)
    if (document.visibilityState === 'visible') {
      document.addEventListener('visibilitychange', resolvePendingPromises)
      document.addEventListener('pagehide', resolvePendingPromises)
      // ⬇️ you could use `yieldBefore` too, depending on the task
      return requestAnimationFrame(() => setTimeout(() => {
        pendingResolvers.delete(resolve)
        resolve()
      }))
    }
    // Still here? Resolve immediately.
    resolvePendingPromises()
  })
}
When the visibilitychange (or pagehide, for reliability reasons) event triggers,
we resolve the pending promises right in the event to ensure the execution of the code after the yield point. If the page is already hidden, the promise is resolved synchronously as part of the Promise constructor.
The following example demonstrates the usage:
someButton.addEventListener('click', (event) => {
  doSomeImportantUIWork(event) //     give user meaningful feedback
  await yieldUnlessUrgent()    // ⬅️ yield before running any analytics code, unless...
  sendAnalytics()              //    ... the user is about to leave the page.
})
Pros
The pattern makes sure to only yield if the document is visible. As soon as the document becomes hidden, the promise will resolve immediately, which means the code after the yield point executes in the same task.
This means, yieldUnlessUrgent gives a strong guarantee of eventually running any pending code after the yield point.
Further advantages:
- the approach is flexible and can be used together with either the
await-interaction-responsepattern to mostly guarantee improved INP oryieldBeforeto slice up tasks (if the user is not about to leave the page) - can be combined with the
idle-until-urgentpattern, like Redbus’ and TK’s article show
Cons
While this is a valid approach to make sure critical code runs as soon as possible, it also means we could still cause slow INP if the code that runs is expensive.
Because of this, it is recommended to use the other approaches first. Reports from the WebPerf Slack found no negative impact on tracking accuracy when solely using yieldToMain.
References
Mixed Use Cases
Now that we know the basic patterns, let’s leverage them to fix some of the most burning INP issues, caused by 3rd-party scripts or not-so-obvious things that can slow processing time down.
Event Handlers & Google Analytics / Google Tag Manager 📊
dataLayer-pushes and gtag-calls usually trigger a lot of 3rd-party analytics code (e.g. Facebook, TikTok, …).
Especially if those callbacks synchronously run in event handlers, it can really prolong the processing time.
For GTM, this can happen when using ‘click triggers’5. We can see how GTM executes right in the click event:
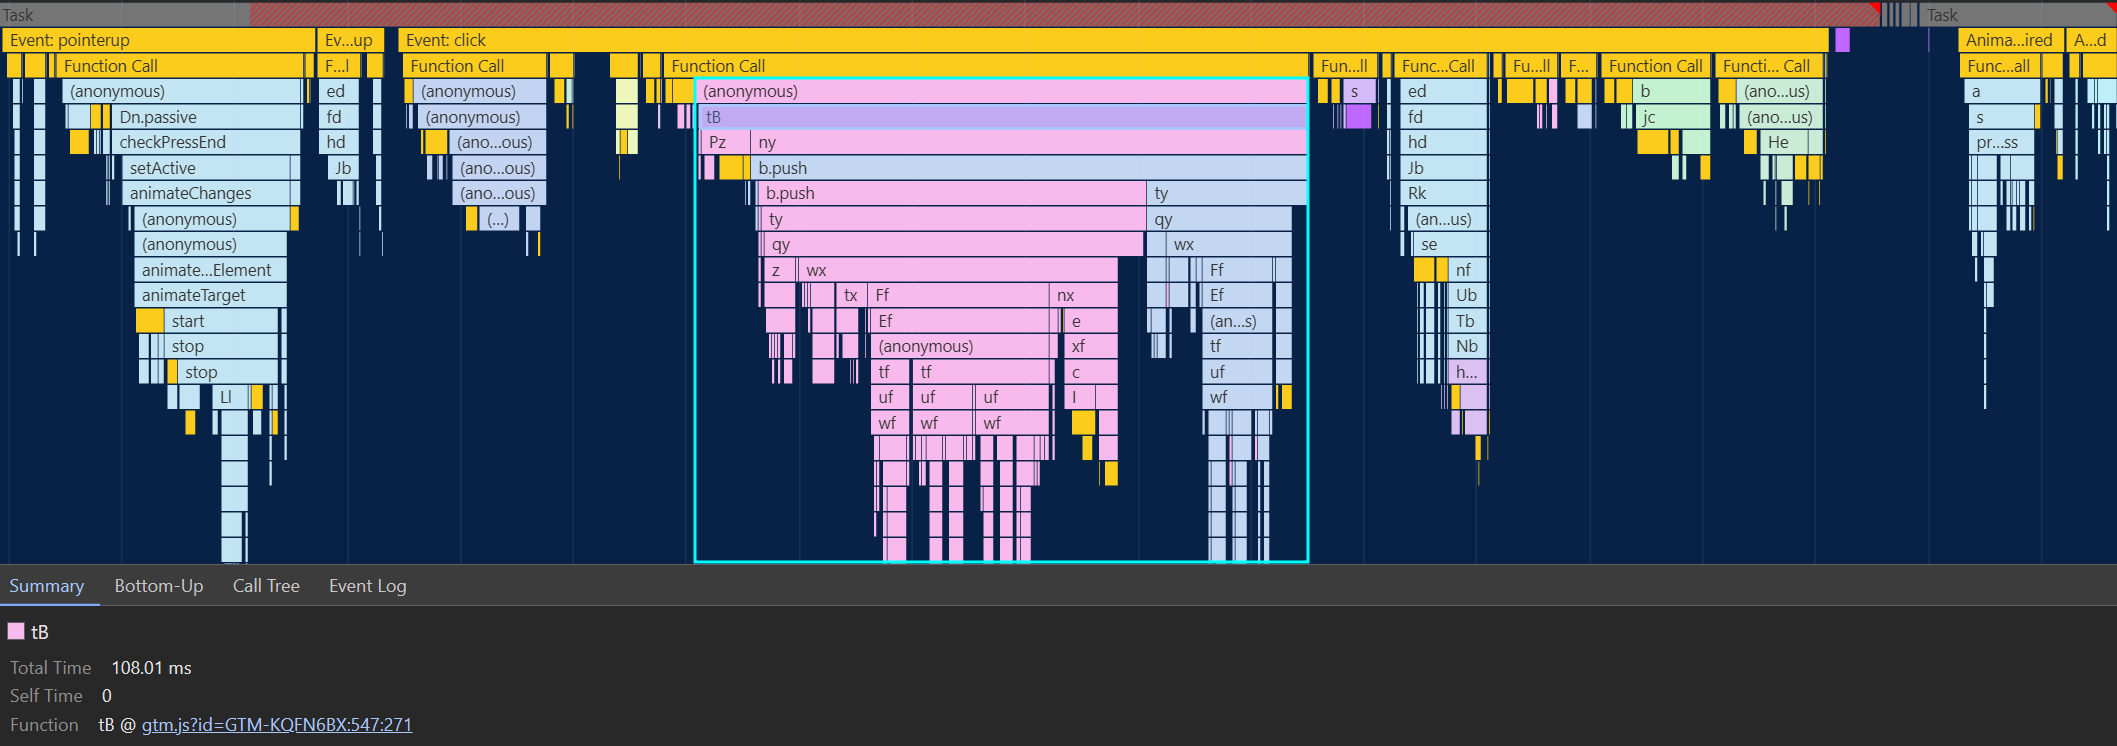
b.push makes a pretty significant portion of the click handler (b.push is dataLayer.push minified).The earlier principles apply here once again. Analytics is invisible and uncertain work – we don’t know how much of it will run and how expensive it will get. So we don’t want to delay meaningful UI updates to run those tasks.
💡️
INP & Cookie Banners🍪
While at it – often expensive 3rd-party code executes at the ‘accept’ or ‘decline’ callback of cookie banners6. Make sure to yield in any of such event handlers before running callbacks. Ask your CMP vendor about it. The more customers ask about it, the more likely they’ll implement yielding before running callbacks.
We have two options to tackle this problem. The first one is, reducing how much JavaScript is executed by Google Tag Manager (GTM) or Google Analytics (GA) – or the amount of tracking scripts embedded. The web.dev article on best practices for tag managers offers insights here. This might not be always possible, so…
Overriding the override
… an alternative option is making sure any tracking code runs after paint, to improve the processing time of event handlers. An idea by Google Engineer Philip Walton is to automatically yield right before pushing:
// Google Tag Manager
const originalDataLayerPush = dataLayer.push
dataLayer.push = (...args) => { paintBefore(() => { originalDataLayerPush(...args) }) }

// Google Analytics
const originalGtagPush = gtag
gtag = (...args) => { paintBefore(() => { originalGtagPush(...args) }) }
At Framer, we shipped this with yieldUnlessUrgent as yield function and execute the overrides during the load event. We’ve seen -15ms at p75 and -50ms at p99 (INP).
📝️
In the Part 2: INP & React⚛️ of this series, we’ll take a look how React event handlers are also impacted by 3rd-party events.
Pros
- Especially useful for 3rd-party code, as it makes sure any code we don’t control also yields
- Saves a lot of time wrapping the data layer pushes manually
Cons
⚠️ Usually the pushes are synchronous, this approach changes them to run asynchronously (as they now yield before executing the original).
If something expects synchronous events (e.g. checks if a push happened right after), it will break (think dataLayer.push('foo'); dataLayer.indexOf('foo');).
Additionally,
- Yielding here potentially just delays when the expensive code runs and does not magically solve the issue of expensive tracking script execution
- You might also want to implement error handling (e.g. a
.catchcall or similar)
Yield before history.pushState() & history.replaceState() 📍
Trackers like GTM and GA can be setup to run on URL changes for SPAs7, which means once again potentially expensive 3rd-party code might be executed whenever history.pushState() or history.replaceState() is called.
While yielding here potentially just delays when the expensive code runs and does not magically solve the issue, awaiting paint also aligns with how browsers update the URL – they navigate first, then update the URL8.
Technically, GTM and other 3rd-party trackers override history.pushState and history.replaceState with a wrapper that calls them whenever that method is executed. So we use the same trick to override their override:
const originalPushState = history.pushState
const originalReplaceState = history.replaceState
history.pushState = (...args) => { paintBefore(() => { originalPushState(...args) }) }
history.replaceState = (...args) => { paintBefore(() => { originalReplaceState(...args) }) }

// by walking the prototype chain, we can access the original, browser native method
// this way you also skip GTM:
history.__proto__.replaceState.call(window.history, { myState: 'foo' }, "", `${location.href}?foo`)
Of course, another fix would be to update the URL outside of event handlers, e.g. after a network fetch instead.
Pros
- Saves a lot of time wrapping the functions manually
- Makes sure any code we don’t control also yields
Cons
⚠️ Usually the functions are synchronous, this approach changes them to run asynchronously (as they now yield before executing the original). Code that depends on synchronous updates might break.
Additionally,
- Overrides browser built-in functionality (but it is worth noting that GTM already does this too)
- Yielding here potentially just delays when the expensive code runs and does not magically solve the issue of expensive tracking script execution
- You might also want to implement error handling (e.g. a
.catchcall or similar) and expect asynchronously thrown errors
Adding or removing DOM nodes🌳
Modifying the DOM, especially children of <body>, can cause a longer style, layout and paint task, which makes generating the next frame more expensive.
While this isn’t directly reflected in INP’s processing time, it is caused by things done during processing time and can extend ‘processing time’ and ‘input delay’.
We have two solutions:
- first hide the DOM node via CSS’
display: noneand then schedule removing the DOM node viarequestIdleCallbackas demonstrated by the PubTech web.dev case-study. - append or remove nodes from very shallow children, like shown in Atif Afzal’s article “don’t attach tooltips to
document.body” to make tooltips 10x faster, from 80ms to 8ms.
In my blog post “Fastest Way of Passing State to JavaScript, Re-visited”, I’ve also linked to a trace demonstrating the impact of the latter.
Updating CSS variables 🎨
A surprising source of slow style recalculations can be updating CSS variables of parents with lots of children (especially nested children). This again isn’t directly reflected in INP’s processing time, but is caused by things done during processing time and can extend ‘processing time’ and ‘input delay’.
A solution is to instead update the CSS variables on every impacted element, like done in this mui-x PR by romgrk:


For more details, check out the Chromium issue on custom CSS properties.
🚀️
Did you like those tips?
Check out my awesome-performance-patches collection for many other small tips to learn from.
JavaScript module (ESM) imports 📦
A note on top-level module imports: Chromium does not yield between top-level imports9.
This means, if there are lots of imports to process, the main thread might be occupied for a longer period, as all import ... from ... statements execute in one big task.
So if user input happens during that big task, we might see slow INP (attributed to ‘input delay’). We can avoid this behavior by using a dynamic (async) import expression:
// synchronous import 🙅♂️:
import * as Foo from './foo.js'
// dynamic import ✔️:
import('./foo.js').then(Foo => ...)💡️
While at it, make sure to serve ESM files with the file extension .mjs so that V8 can streamingly compile for best performance.
Videos & long gray tasks 🌫️
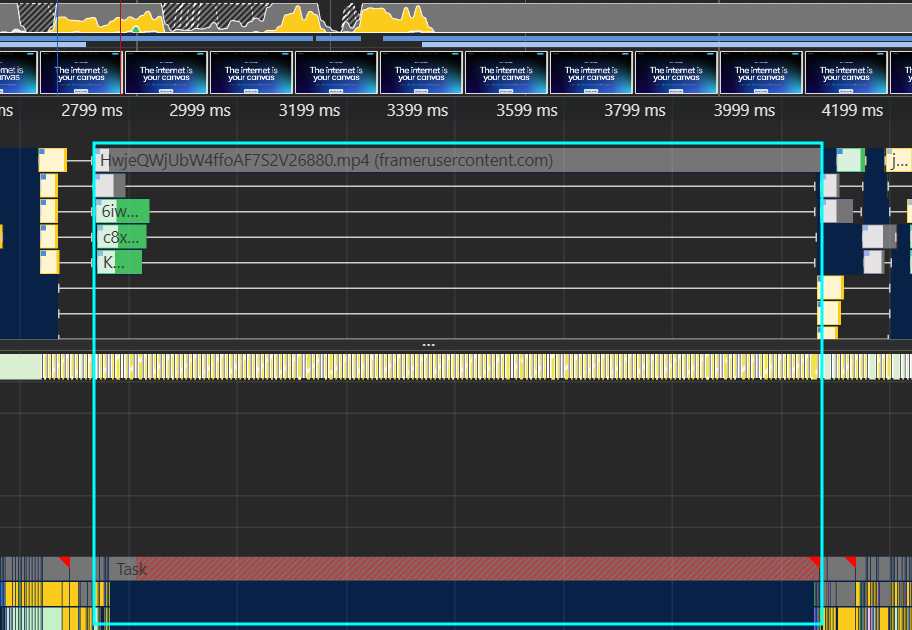
This one is quick, but I’ve never seen anyone blogging about it explicitly: Simply having <video>s in the DOM can produce bad INP. In the following screenshot, we can see the browser is not painting any frame until the video has been fully downloaded.
There are two things that can be done to improve this:
- Change the video so it’s cheaper to decode – try different codecs (e.g. VP9 to H264), lower the bitrate
- Set
preload="metadata"on<video>, so that the video is only fully downloaded when actually played - Set
preload="none"on<video>and use an IntersectionObserver that sets it topreload="metadata"so that the video only downloads when the user comes close to it
The reason for why those two things improve the situation is, <video>s have an implicit preload="auto" (Safari) or preload="metadata" (Chrome, Firefox) attribute set, which means even if a user never sees the video, it will be (partially) downloaded.
If you want to take this a step further, you can toggle preload="metadata" and preload="auto" on playback depending on the user’s network conditions (e.g. RTT), as the former will throttle the download (while maintaining consistent playback).
I call it ‘long gray task’, because it does not have any subcalls, even if you turn on the ‘show all events’ DevTools experiment. In other cases, a tip to understand such gray tasks is to load the trace (e.g this one) in Perfetto –
in this case, there is no event that seems related.
Is this a Chromium bug? Unsure. You can easily verify if videos are the cause by blocking *.mp4 resources from loading via DevToools – ‘More Tools -> Network request blocking’.
Footnotes & Comments
This post is part of the multi-article ‘How To Improve INP’ series:
- Part 1: Intro to Yield Patterns (👈 you’re here)
- Part 2: INP & React⚛️
- Part 3: INP & View Transitions✨ (⌛ coming soon)
Big 💙 to Barry Pollard, I owe you one for the discussions, images and support; and thank you to Michal Mocny, Gilberto Cocchi and Philip Walton for reviewing this post.
Footnotes
-
Running less JavaScript is a great way to make sure the main thread stays free. See also Ryan Townsend’s talk (slides) from PerfNow23, where he shows how to replace some JavaScript-based UI with more modern platform-native implementations. ↩
-
To be specific, the callback runs after the rendering pipeline, which includes e.g. ‘Commit’ and ‘Layerize’, and not just the ‘Paint’ step. This also means, it can also follow ‘Pre-Paint’ – if the step invalidates no changes, the paint can be skipped. The
requestAnimationFrameis still executed. ↩ ↩2 ↩3 -
For a visual explanation what a (macro-)task is and how it fits the browser rendering loop, check out Lydia Hallie’s “JavaScript visualized” video for a simpler explanation, or for the most in-depth video you’ll ever see: Jake Archibald’s event loop talk – or Andrea Verlicchi’s transposition of it. ↩
-
Checkout the comment in the w3c/long-animation-frames repository from Chromium Engineer Michal Mocny for more details. ↩
-
See click trigger GTM docs. ↩
-
See also the PubTech web.dev case-study. ↩
-
See Jake Archibald’s tweet. ↩
-
See the spec issue for more details. ↩